Pages

Friday, May 31, 2013

A Journey of Healing.


"Discover the Whole30 and Change your life in unexpected ways" -It Starts With Food, Melissa and Dallas Hartwig
I am embarking on a new journey.  Tomorrow I will begin a program of food elimination to determine if any of the foods I consume on a regular basis cause inflammation leading to pain in my joints and general body.  For the last year I have been suffering mysterious pains that many a doctor have not been able to diagnose.  I have had diagnoses ranging from Rheumatoid Arthritis to Fibromyalgia to Bursitis to something as simple as having over flexible joints.  None of these diagnoses seem to fit and yet I am exhibiting symptoms that would fit all of them.

There is a firm belief within the nourishing foods community that what you eat can affect your body in ways that go beyond weight and general health.  I truly believe that what I am eating has short and long term core effects on my immune system and the health of my joints.  Some of you may be saying "Duh" some may be dismissing me and changing the page.  Hopefully, most of you are intrigued and want to know more.

I picked up the book "It Starts With Food" by Dallas and Melissa Hartwig on recommendation from a friend of mine.  I figured it would be another self help, nutrition read that I would store some of the information in my reserves of food knowledge but, something about it seemed different.  Something made me want to read it cover to cover rather than skipping through to the "good" parts.  What was different about this book as opposed to the many, many others that sit on my book shelf?  It made sense, really made sense.  The description of the program, the science behind it, the engaging prose, it drew me in and clicked.


Sitting here on my bed, writing this, I glance at my bedside table littered with prescription bottles of anti-inflammatories, pain killers, muscle relaxers, and anti-depressants.  The spoils of many a doctor's attempt to medicate me and alleviate the mysterious pain just long enough to let me get my 8 hours of sleep.  My heating pad is never far and my freezer has ice packs of all shapes and sizes.  I spent 2 days at the beginning of this week immobilized and resting due to the pain I felt after enjoying a short nature hike.  This has become my journey of the last year.  A journey of waking up each morning wondering what or if I am going to hurt, second guessing whether my knees or ankles will support me.  Always waiting for the tingling and swelling in my hands to dictate how I will spend my day.

 Anticipation is what I feel tonight.  Almost giddy, my refrigerator is filled with the nutritious foods that will sustain me through this first week of my Whole30.  Foods that will help me heal, foods that will nourish my body and help it rebuild, foods that are whole and real, not filled with chemicals that my grandmother never heard of much less could pronounce.  My prescription bottles will be replaced with supplements such as Fish oil and Magnesium.  Fermented foods, filled with living bacteria that will restore my gut to a healthy balance, will grace each meal plate.  Pizza will no longer be a once a week treat, bought or homemade.  Chocolate and a glass of wine will no longer be my evening wind down.  Anticipation, yes, nerves, definitely.  This is only for a month I keep telling myself.  This is a journey about discovering a healthier, happier me.  A mental and physical reboot of sorts.  A journey of healing myself from within.

The Whole30 is an elimination program where inflammatory foods are removed for a month then slowly re-introduced to examine their effects on your body.  During the 30 days you eliminate soy, sugar, dairy, gluten, grains, legumes, and alcohol from your diet.  The program is based on the Paleo lifestyle however, it also eliminates items that are allowed when eating Paleo.  The focus is on eating foods that make you healthier such as, grass-fed and pastured meats, seafood, eggs, fruits and vegetables, healthy fats like coconut, avocado and olive oil, nuts and seeds (in moderation).  These are all foods I enjoy and eat regularly.  Please read this page for more on the philosophy behind the Whole30.

Over the next month I will be sharing with you my experiences, menus, and musings about my Whole30 journey.  I have prepped well for this and mentally am ready to embark.  Please reach out to me if you have any questions or are interested in doing a Whole30 for yourself.  Below I have included a few links that have helped me prepare as well as my Whole30 pinterest page so you can see some of my inspirations and recipes that will keep me going for the next 30 days.  Enjoy!

Whole30 Learn about the program and book "It Starts With Food"
Whole30 -Facebook Connect with others
Pinterest -Whole30, it's happening My inspirations
Free Downloads Shopping lists, quick start etc
The Foodee Project An extensive compilation of Whole30 approved recipes
The Clothes Make The Girl -I am highly enamoured of this site and can't say enough about the book "Well Fed" by the same author
Balanced Bites -Another wonderful blog resource but the book by the same author "Practical Paleo" is one I could not recommend more highly. Even if you don't do a Whole30, get. this. book.

Tuesday, May 28, 2013

Wild Edibles; Foraging for Real Food

A sunny spring day in New Jersey always makes me itchy to get outside and play around.  The Hubinator and Pups seemed to have the same idea so we donned our hiking boots, strapped the harness onto the dog and headed over to Willingboro Lakes Park for a hike.  With the breeze blowing and the sun shining we crossed what appears to be an overgrown parking lot, we walked towards the sandy trails surrounding Olympia Lakes.  The site used to be host to American Bandstand dances and the remnants of those days are apparent, over grown concrete structures and the rusted out leavings of bulb lit signage.  As we traversed the weed cracked concrete I noticed the first signs of wild edibles.
Poking up through the scrub there were the un-mistakable round heads left after an onion flowers and goes to seed.  Onions pop up first in Spring, all you have to do is walk out to the yard and pull 'em up.  Rinse them off and there you go, fresh onion!
There is a plethora of "weeds" we can eat. Used medicinally or nutritionally, we are able to forage a good amount of nutritional plants. A weed is simply a plant that grows where we don't want it however, it has a place in the environment, edible or ornamental.  You can find so many wild edibles while on a walk, you just have to know what to keep your eyes open for.

We quickly came across a thatch of Wild Blackberries.  I know they grow all over this area but I didn't think I would find them in such mass (hopefully no one else knows to look for them).  I will be back with bushels! 

If you are looking for edible berries in the wild, all green, red, or black conglomerate berries are edible.  When green, they need to ripen so check back.  When red, they may be ripe so taste and check back if bitter. When black, they are ripe.  Conglomerate berries are when a large number of seed heads appear on one "berry" (like raspberries or blackberries).

The first year in our house we began to see conglomerate berries on a few trees in the back yard.  As summer wore on the Hubinator exclaimed, I know those berries!  I had no knowledge at the time so ignored him.  When his mother visited that summer she immediately said they were
mulberries.  Well, gosh be gone we had a new food source in our back yard!  We instantly began taking care of the trees in a way that would produce more berries, now we have enough to eat fresh and make jam every summer!  Mulberry trees can be identified by their serrated, shiny, heart shaped leaves.  The leaves alternate (not opposite) as they grow down the branch and they have a rough, almost hairy underside.

After crossing the expanse of the old parking lot we entered the wooded area.  As the pooch meandered along, sniffing all the new smells, and my eyes open to more wild edibles I spotted the distinct leaf shape of nettles.

Nettles are delicious and nutritious.  They are high in calcium, magnesium, iron, and potassium.  When dried and made into tea they can help alleviate allergies and hay fever.  They can also help with high blood pressure and headaches.  Look for an egg shaped leaf that is highly serrated on the edges.  The leaves will be opposite from each other and the plant looks similar to mint.  They will have a hollow stem and little furry spines (ouch, don't touch).  There are no poisonous plants that mimic nettle so don't be worried if you mis-identify.
Nettles can be gathered and used in a pesto, they can also be sauteed and used in risotto or stirred into pasta like spinach.  They are delicious enough on their own to be made into nettle soup or nettle tea. 
*Be very careful when harvesting nettles as they do sting and can cause a rash.  Wear gloves when handling until you have steamed them.

We rounded the lake, remarking at the sheer amount of nettles and blackberries and vowing to come back soon.  The woods broke and we were back in the bright sunshine of the parking lot.  Happily already writing this post in my head, I spied one more wild edible out of the corner of my eye.  Amaranth, one single, lonely stalk.  A single stalk is really nothing of note except that I can harvest the seeds and plant a patch in my garden for next year. Both the leaves and seeds of the amaranth plant are edible.  If you are lucky enough to come across a large patch you can harvest the leaves throughout the summer and steam or saute them the way you would a light green.  In fall however, grab a few friends and a few new, clean frisbees and head out to your found or cultivated patch.  Tipping the flowering end over the upside down frisbee, rub vigorously between your hands to release the chaff and seeds.  Harvest as much as you can, spread on a tray and leave to dry overnight.  The next day lightly blow across the tray and the chaff will blow away, leaving the edible seeds.  Pick out any bugs and keep in an airtight jar.  To cook: using a 1-2 ratio of amaranth to water, boil for about 20-25 minutes.  Use where you would use rice or other grains.  Delicious.

What a delightful way to spend a warm Spring day.  Next time we will bring some bushels and scissors with us and collect everything we can carry.

A few more wild edibles you may find in your backyard or a nearby hiking trail:
Sassafras is the main ingredient in File powder which is used for thickening and adds that unique flavor to gumbo.  You simply need to pick a few leaves, wash, and lay flat to dry then run them through your food processor.  Sift the powder and store in an airtight container.  You may also make a tea out the dried leaves or cleaned roots.  The tree can be identified by it's distinct tri-lobed and bi-lobed, mitten shaped leaves.  When crushed, the leaf emits a bright lemony, slightly fruity scent.


Purslane is abundant in the hot summer months.  My backyard is overrun by it.  I love purslane season.  It has a grassy flavor similar to watercress or slightly spicy like arugula.  It is delicious mixed into potato salad or cucumber salad.  It is also delicious on it's own, sauteed with some popped mustard seeds and cumin.  Purslane is high in beta-carotene as well as magnesium and potassium.  You can identify it by it's fleshy succulent leaves and resembles a mini jade plant.  The new growth on the ends of the stems is edible as well as the leaves.

Last but not least, we can't forget our friend, the Dandelion.  There are so many wonderful uses for this little plant.  I don't think I could capture their uses better than Health Extremest, but I can tell you, the newly grown leaves are delicious in soups or a salad.

So get out there and harvest some wild edibles, fill your salad bowl with some of these wild greens and feel the satisfaction of sustainably and deliciously feeding yourself.  Enjoy!


*Make sure you harvest from an area where pesticides are not used. 
*My identification information is 100% true to my knowledge and research however, please use your best judgement when harvesting for yourself.  If you are unsure of the plant species, go home, do a little more research for yourself, and then decide whether or not to eat it.  There are some great field guides available for wild edibles in your area. 


Thursday, May 23, 2013

Spa Day: Recipes for a Rejuvenated You


Occasionally I go to a spa for some pampering but more and more I am making products for treatments at home.  I like to know what ingredients I am putting on my body.  One rainy afternoon when the Hubinator was out of town and I had nothing pressing to do (or I was forgetting everything I needed to do), I decided to give my self a little pampering.  This is a really nice way to treat yourself well and feel relaxed and rejuvenated without having to get out of your PJs or spend big bucks.  The only part I missed?  A massage.  Oh well, I guess you do have to leave the house for that.

Some supplies you will want to have on hand before you begin:

Therapeutic oils:
As you may have guessed my first choice is coconut oil however there are many others you can use:
  • Avocado and Apricot Kernel -deep moisture, best for very dry, itchy, or mature skin
  • Grapeseed, Jojoba, and Olive -great for most skin types
  • Almond -all skin types, especially for oily skin

Good quality herbals:
  • Lavender
  • Chamomile
  • Calendula
  • Dried Rose Petals
  • Herbal Tea bags -if you like the way it tastes you probably like the way it smells

Cupboard Items:
  • Oatmeal
  • Yogurt
  • Honey
  • Cinnamon
  • Nutmeg
  • Bananas
  • Avocado
*You won't need all items.  Use the following recipes to assemble what you need, and keep them on hand for the future.

Misc:
  • Bowls
  • Towels
  • Candles
  • Boiling water
Prepare your bathroom; create a serene, quiet, and comfortable atmosphere.  Clear the area around your sink, remove anything from the rim of your bathtub (you know your face wash and shampoo are sitting there), light candles, get in a bathrobe or comfy pajamas, put on your favorite tunes,  and relax!

The order I put these treatments together in maximizes the effectiveness and benefits to your skin.  I've included a few recipes for each step, choose the best ones for your skin type.  If you have sensitive skin, please be gentle with it and everyone should test unfamiliar ingredients first to make sure you do not have a reaction.

  1. Cleanse
  2. Exfoliate
  3. Steam
  4. Mask
  5. Moisturize

Begin by boiling 2-3 cups of water while you prepare your treatments.  Once the water is boiling add your herbs to infuse.  When your treatments are mixed, line them up next to your sink in the order that you will use them.

Cleanse:
Oil cleansing is a wonderful way to remove dirt and leaves your skin balanced and smooth.  You skin really likes oil, I promise!  You can read all about the method over at Thank Your Body, I like to use coconut oil mixed with olive oil but choose any oil from my list above.

Honey is also a great cleanser, it is anti-bacterial and really gentle.  It too will balance you skin and will also brighten, minimizing some of those dark spots.  I recommend using local raw honey, but what you have on hand is fine too.  Pour about a tablespoon into your palm and rub your hands together to warm and soften it a bit.  Then smooth it onto your face, focusing on trouble spots first.  Then wet a washcloth with very warm water and hold it to your face for a few seconds, remove while wiping away the honey.  Repeat with the warm washcloth as many times as needed to remove the honey.
You want to start with a clean face, removing as much surface dirt as possible without stripping your skin of it's natural oils.
These methods will thoroughly clean your face without the use of harsh chemicals present in most commercial cleansing products.

Exfoliate:
Combine all ingredients in a small bowl, mixing to make a paste.  Wet your face and gently scrub in a circular motion.  Rinse off with warm water.
Heavy -1 tsp baking soda + 1 tsp water
Light -2 tsp Coarse Sugar + 1 tsp Oil (of choice)
Lightest -2 tsp coarsely ground Oats + 2 tsp Oil (of choice)
Exfoliating removes dead skin that has built up and will leave your face soft and smooth.
*Baking soda can be harsh, do not use if you have sensitive skin.  I use this once a week, then supplement with the other two for general exfoliation.

Steam:
Mix 1/3 cup of Lavender and 1/3 cup of Calendula or 4 bags of your favorite herbal tea, steep for 10 minutes in boiled water.  Take your steeped herbs in boiling water off the stove and place it in your sink.  My sink accomodates a small saucepan if yours doesn't then strain the herbs and pour in the water (to keep herbs from washing down the drain, not good).  Lean over the sink and cover your head with a towel, essentially creating a steam room.  Stay for 10 minutes or as long as you can stand.
This really opens up your pores and allows for the mask in the next step to sink in and do its job.
*You can dry and save the herbs or tea bags for one more use.  Make sure they are thoroughly dry before storing.

Mask:
Mix up your mask.  Apply all over your face avoiding your eye area.  Leave for 10-15 minutes.  Wash off with warm water.  I like to use the hot water washcloth method described above.
I keep frozen cubes of yogurt for just this use.  It's also a great way to use up the last of your yogurt if it has gotten a bit too strong tasting to eat.  Pour yogurt into ice cube trays and freeze.  Keep in a plastic bag in the freezer.  When ready to use simply place a cube in a bowl and allow to defrost, usually about 1/2 hour.
Mix 1 Yogurt cube or a couple Tbsp of Yogurt with 1 tsp Honey.  Add one or many of the following:
  • 1/2 Banana, mashed -The potassium in the banana will help even your skin tone and Vitamin A and E will help with fine lines and wrinkles
  • 1/4 Avocado, mashed -The fats in the avocado are great for moisture
  • 2 tsp Whole Oats or Oat Groats -Great for sensitive or "trouble" skin, they soothe and nourish and help reduce any inflammation.
  • 2 tsp Lemon Juice -Tones and balances your skin, helps reduce dark spots.
  • 1/4 tsp Cinnamon and 1/4 tsp Nutmeg -helps alleviate inflammation or acne
Moisturize:
I end the whole experience with a good slathering of coconut oil.  I don't recommend this if you need to leave the house (or if friends are due) it can be a bit greasy.  If you want a less oily appearance then use Jojoba or Almond oil.


I like to do a mini version of this every few weeks but if I have a couple hours to spend I add one more step, a bath!
After applying the mask, sink into a tub filled with warm water (hot water is drying to your skin) scented with essential oils, add some oats, or milk, or leave the water plain.  Relax and breathe deeply while you let the mask do its work.  After about 10 minutes, stand up and apply an exfoliant to your entire body, my Coco-Coffee Sugar (or Salt) Scrub is perfect here.  Do this while the tub empties.  Once you have rubbed and scrubbed, turn on the shower to rinse your face and body.  While you are still wet, smoothe a small amount of coconut oil or oil of choice all over your body THEN towel off.  If so desired, apply a body lotion......upcoming post "Homemade Body Butters"!

Now that you are relaxed and rejuvenated go, have a glass of wine, watch a movie, paint your toenails, even go to bed.  Mostly though, Enjoy!


Wednesday, May 15, 2013

Time runs away and why I plant perennial herbs

You know how life occasionally takes over and you feel like you have too much to do in too little time? Well, than was my week/ weekend thus far.  Gardening season is a very busy time for us, then add in a hubinator who travels and is currently travelling? As a professional homemaker and aspiring homesteader, I greatly feel the loss of those two extra hands. I also try to spend that time wisely, while I don't have another person to worry about.  It's a mixed blessing. That's when life gets away from me and important projects can get lost in the melee of revelling in freedom to make a mess in the kitchen and not have to clean up for dinner, or testing oddball recipes.  Needless to say...this week has been a busy one.
I have had a happy reception to my new blog and FB page, I have had followers and friends tell me they love the content. I have even had some requests about future posts. I value you and your input. This is why keep going, these comments are what keep me posting. I am so pleased to hear you like what I have to say.
That being said, I hated that I haven't gotten to my regular Monday post and I know you all understand. So I will leave you with this little snippet on gardening with herbs, inspired by an old friend of mine.

When you plant herbs, choose perennials, don't waste your time on annual herbs.  Herb bunches are cheap enough to buy, even organic but the plants don't produce enough for the time or space spent on cultivating them.

Dedicate space for thyme and oregano permanently in your garden.  Italian Parsley is biennial, meaning it will last a couple (or more) years.  Lavender and Bee balm are two that I choose to plant because I love the smell, the flower, and they are great for tea.  The only exception to my rule is basil.  Basil is quite prolific and will continue to bush as you snip off the tops for use.  And fresh basil is so tasty!  Allow enough space however, some herbs can take over, like mint.  I found oregano growing up through the weed cloth in between boxes at the start of the year!


Friday, May 10, 2013

Carrington Farms Coconut Oil


Carrington Farms Coconut Oil is by far one of the best coconut oils I have tried.  In the big wide world of coconut oil it is hard to pick one that is not only quality but one that is not hard on the wallet, especially if you use it as much as I do (remember my post, Coconut Oil; Beware, It's and Obsession)?  I have bought a few small jars of other brands in the past but have not been happy with either scent or taste, I wasn't as educated then either so was picking blind. However, when I found Carrington Farms in my local club store I quickly researched the company and reviews on my phone and just as quickly threw 2 54 oz. containers in my cart!

Folks, this stuff is wonderful!  It is Organic, unrefined, cold pressed, extra virgin, coco-nutty goodness in a jar.  Even if my club store stops selling it I will purchase wherever I can (here).  The smell and taste are like opening a coconut and eating or smearing it on your body.  When I cook with it though it doesn't have an over powering coconut flavor so I can easily use it in place of other oils that would break down when heated.  I have also used it an many of my homemade cosmetics and remedies, leaving my skin nourished, soft, and sweet smelling, I swear it has reduced the fine lines around my eyes since I started applying it before bed.  I have even used it to make a remineralizing toothpaste because of it's antibacterial qualities.

Check out their other awesome products Carrington Farms

I love Carrington Farms Coconut Oil so much I am giving away a whole 54 oz container! If you are a newbie to coconut oil or a veteran user, you will be hooked once you try this one.  I am so excited to be able to share it with you!  Enjoy!

a Rafflecopter giveaway **Sorry to my out of US readers, I cannot offer this giveaway :( It does not mean I do not love you though!  Thank you for your support!

Thursday, May 9, 2013

Bullet proof Tea

Good Morning Folks!
Awhile back I came across a recipe on one of my favorite blogs The Wellness Mama for Bulletproof Coffee.  I am no longer a coffee drinker but instead enjoy a big cup of tea in the morning.  I wanted to adapt this recipe to my own tastes and make it work with tea.  Some of the ingredients are gonna make you say "Has she lost her mind? Gross, oil in my tea (or coffee)?"  Really kids, this tastes good and is so good for you!


Don't laugh at my Harley cup, I could have photographed one of my handmade pottery cups but this is actually what I drink my morning tea out of!


Bullet Proof Tea (or coffee) 
  • 1 tsp Coconut oil (work your way up to a tablespoon)
  • 1/2 Tbsp Assam, Irish Breakfast, Earl Grey, or even just a bag of Lipton
  • 2-3 Cardamon Pods
  • 2 Whole Cloves
  • Sweetener of choice, to taste
  • Grass-fed Raw Milk, optional to taste
Combine the Cardamom pods, Cloves, and tea, if using loose, in a tea ball or sock.  Dollop the Coconut oil in the bottom of your cup with your sweetener of choice.  Pour boiling water into your cup and add the tea.  If you are using a tea bag the spices will simply float to the top and you can remove them when done steeping.  Add milk, if desired, and steep for 2-3 Minutes.  Remove tea, give a stir and enjoy!  Wellness mama suggests you whir it up in a blender to emulsify the oil for a smoother consistency (she also uses grass-fed butter, not there yet for me).  I however like the fact that the oil coats my lips and I have the added benefit of instant lip balm while I sip my tea.  Not everyone likes an oily feeling with their morning drink however, so whir it up a bit if you want!
You can check out Wellness Mama's recipe for Bullet Proof Coffee Here.

I buy the majority of tea from a good friend Butiki Teas. She has an amazing, wide assortment of teas and tea wares. She really does her research to bring you the best quality teas available.  She has a new Irish Breakfast coming out this week, I can't wait to try it!

Tuesday, May 7, 2013

Weekend Drive in the Country, Preserving the Bounty, and How to Find Local Foods. May has Arrived.


KohlrabiLasparagus

We've had glorious weather recently in Southern New Jersey and I definitely caught a case of Spring Fever! This weekend I picked up my sister from play practice and headed out through beautiful Eastern PA, on back country roads, to my favorite farm for my weekly purchase of raw, un-pasteurized, fresh milk. When I called them earlier in the week to reserve my weekly milk (yes, it is so popular you have to reserve it) I was told they were already out of eggs for the weekend. Since I pass a couple of other farms selling eggs along the way I decided we would meander the way to our destination and hit up some of those farms. Let me just paint this scene for a moment; The weather is 70 degrees, the sun is shining, the car windows are open, and *EEK* Top 40 is on the radio (not my music of choice but hey, my sister is 10). Ignoring the wailing of "insert popular songstress here" I turn to my other senses and view the beautiful countryside and hills surrounding the base of Buckingham Mountain. Spring is in full force and the are trees bursting with pink and white flowers, the smell of the Earth awakening is in the air. Everywhere I look I see beauty. As we drive my sister turns to me and asks "Why do you drive 45 minutes away just for milk and eggs when you can go to the grocery store in 5 minutes?" Very good question. I answered "Because the eggs we are about to buy were laid by chickens less than 4 days ago, the milk was in the cow less than 2 days ago. They are the freshest they can get and I know the farmers who sell them to me. I've seen the chickens and cows in the pasture, I know they are well cared for. That is really important to me." Her response "Eww!". Oh well, she'll appreciate it when she gets older.

  The farm I decided to stop at is 
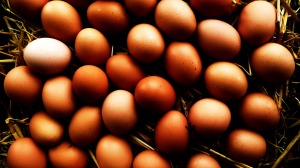
Milk House Farm Market. They are located in a beautiful old farmhouse with a big red barn in back. I have always wanted to stop, it just calls to me, but have never been in the position to do so. When we pulled up there were chickens scratching around the yard and a little old lady filling egg cartons from a large basket of freshly pulled eggs. I have died and gone to heaven! When we walked into the small market room in front I was greeted by baskets of radishes, beets, a few small tomatoes, herbs, jars of honey, and a refrigeration case filled with eggs, milk, yogurt, and butter. Oh my gosh, I have died because this is definitely heaven! The little old lady came through from the back and greeted me, arms full of egg cartons. "Honey, you arrived just at the right time, we've just pulled fresh eggs and a few of the cartons even have our famous blue ones. We're known around here for them." she brightly said to me "Well that is just what I am here for." I responded with a huge smile. We chatted for a moment or two, I learned that they keep a variety of laying hens, they are open 7 days a week, and only stock vegetables, fruits, and herbs they can bring in from their fields and surrounding farmers. I also learned their strawberry plants are bursting with fruit and that I MUST come back at the end of the month, but make sure I arrive early in the day. She was so sweet and the energy was so welcoming, I will most certainly be back later this month to stock up on strawberries.

EggsFresh eggs in hand we piled back into the car and travelled the 5 minutes to Birchwood Farm and Dairy. I love pulling into this tucked away farm, as soon as you come up the short driveway the land just opens onto beautiful pasture. I walked in and the young lady greeted me by name, I guess I go often enough now. They carry fresh raw milk, homemade yogurt, ice cream, eggs, organic fresh orange juice and a wide variety of pastured, grass-fed meats. A few weeks ago I purchased a chuck roast from them and it was so tender and delicious. Their spicy Italian sausage is wonderful (although very spicy) and the short ribs are to die for! I cannot wait until later in the season and they have bacon, nitrate free and salt-cured. I like to buy a large cut of meat when I am there, they raise all the livestock and use a local butcher to process the meat. Talk about getting to know your community. Its really important to me that I know my farmers and they know me. I'd never be greeted by name at the grocery store and who knows when the eggs were laid or how the chickens were kept. This relationship makes food that much more nourishing and meaningful. After securing my purchases in the back seat we started our drive home. Feeling happy and content I settled back in the driver's seat, gazed again at the pastures, and quite honestly didn't even notice that "insert popular songstress here" was continuing to wail on the radio.


There are many things I love about May, planting season is fully upon us, everything is blooming and the Earth is alive again, and Farmer's Markets re-open for the season. Being avid gardeners, the hubinator and I grow a large variety of vegetables that we both enjoy during the season and preserve for eating over winter however, we can't grow every single thing we might want. Enter Farmer's Market. I love waking up Saturday morning, preparing breakfast, and filling up my tea cup to take with me to my local Farmer's Market. Feeling the warm sun on my shoulders I walk through the local agriculture center and take in the heaps of produce brought in by the farmers in the surrounding area. My first stop is always the mushroom man, he hails from Kennet Square, PA (mushroom capitol of the US, ya know) he has the most beautiful shitakes, portobellos, and interesting varieties like Hen of the Woods. Next stop is Busy Bee Farm, she carries pesticide free lavender and a variety of local honeys, did you know eating honey from local bees can help reduce allergies? Yup, it builds up a kind of immunity to the flora in your area! After picking up some fruits and veggies I end my rounds with Made in the Shade Lemonade, the cucumber-mint is to die for. I like to supplement my home grown veggies with veggies from the market but my favorite aspect is that I can buy bulk amounts that I wouldn't be able to grow at home and stock up my cupboards for winter. This month I will stock up on strawberries over at Milk House. There are a few great resources on the web for locating Farmer's Markets and pastured grass-fed meats and eggs in your area. I keep an eye out for local magazines that are often offered for free at your *OOF* grocery store (we all need toilet paper every once in awhile). Or contact your local extension service, they can point you in the right direction. Here are a few of my favorite websites:
If you don't have the space or desire to grow your own fruits and vegetables then Farmer's markets are definitely the way to go. Not only are you getting the freshest organic produce but you are also supporting your local farmer, I am sure you have seen the bumper stickers "No Farms No Food", well it's true. Let's bring our dollars back to our communities and support local agriculture. I've touched on preserving your bounty a few times. Its quite easy to do and really there is nothing like making salsa in December from tomatoes that actually taste and smell like tomatoes. Each month during the summer season I will bring you recipes for preserving fruits and vegetables that are coming in during each month. I may even throw in a recipe you can enjoy with out preserving! I am not here to teach you how to can, I don't dare proclaim myself an expert, I have done a lot of reading on the subject and I know what has worked for me. I urge you to read up on canning basics before you try to do it for the first time. It's really not hard but there are a few things you should know, I still check the internet or my books for processing times everytime I make a new batch. I will provide canning times in the recipes I use but please, do some research and use your personal best judgement. A few websites I hands down trust are:
Now that I've gotten the fine print out of the way......
strawberries


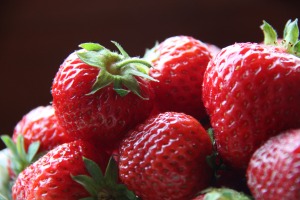
Preserving the Bounty: Strawberries

Freezing is a great way to preserve your berries. Fill your sink with water and add 1/4 cup Raw Apple Cider Vinegar. Submerge the berries gently, swishing around to remove any dirt. Drain and place between two kitchen towels to dry. Place on baking trays that fit in your freezer, the idea here is to freeze them separately so they don't freeze into a big clump, you can skip this but it will be harder to use them in the future. Once frozen, place in a freezer storage bag. Voila!

Oven drying or dehydrating strawberries is another wonderful way to preserve them. Clean your berries and slice them. Very lightly grease a baking sheet and spread the berries in one even layer. Bake in an oven set at 150 degrees or the lowest setting you have. Check your berries every few hours, once they begin to shrivel flip and continue to check. They are fully dehydrated when they have shrivelled quite a bit and are no longer sticky to the touch. Store in an airtight container 6 months to a year. With a dehydrator set to 125 allow to dry for 8-10 hours or until fully dried. These are delicious as a snack right out of the jar, sprinkled over cereal, or mixed into your favorite granola or trail mix.

Strawberry Preserves
  • 4 Cups Strawberries, crushed
  • 2/3 Cup Unsweeted Fruit Juice -If I am feeling industrious I will crush & strain a few extra berries, otherwise apple juice or even water work well here
  • 3 Tbsp Low/No sugar Pectin -I use Ball RealFruit Brand
  • 1/2 Cup Honey or Organic Sugar -Optional, I do not use sweeteners
Prepare water bath, jars, and lids. Combine all the ingredients except sweetener (if using) in a saucepan. Bring to a hard boil stirring continuously. If you are using a sweetener, add it now and return to a boil for a full minute. Remove from heat, occasionally some scum will rise to the top, this is absolutely normal and should be skimmed. Fill ½ pint jars to ¼ of an inch from the top. Wipe the rim with a clean cloth to remove any spills. Place lid on top and screw on rim until finger tight. Gently place in water bath making sure the jars are covered by 2 inches of water. Bring water to a steady boil and process jars for 20 minutes. Remove jars from water bath and place on a dish towel on the counter to cool. Sit back and enjoy “pop pop pop” sound of your jars sealing. After Preserves have cooled check to make sure all of them sealed, fully tighten the rim, and put away in a cool dark place to enjoy over the winter! If any have not sealed then place them in the fridge and enjoy within 3 weeks.

Variation: Add ½ tsp cracked black pepper for a spicy twist

Coconut Oil; Beware, it's an Obsession!

coco_oil1

Coconut oil has become wildly popular in recent years, so much so that since I began research for this post last week, 4 of my favorite blogs posted about it's benefits! It has been a well kept secret for ages in coastal areas and warm climate countries. Predominately used for cooking, the flavor is most often associated with Asian style curries or many of those fruity drinks folks purchase on beach vacations. It is high in saturated fat but due to it's chemical make-up it breaks down in your system quickly before it can be converted to fat leaving it immediately available as energy.

There are so many uses for coconut oil apart from cooking. First the obvious, it is highly moisturizing, leaving your skin feeling supple and replenished.  It has a warm scent that is gentle and does not linger.  It is both anti-microbial and anti-fungal so when used topically it will promote healthy skin regeneration, not pimples!  It works wonders on the under eye and chest areas where skin is more delicate and prone to wrinkling.  Lastly and my favorite, it actually can help you lose weight and feel more energetic, this comes back to it's chemical make-up because it is a saturated fat you feel fuller for longer but it doesn't turn into fat easily in your body.  Some women have claimed that their cellulite disappeared when they started taking 1-2 teaspoons a day orally (WOW)!  What is not to love about this wonderful oil?

I first picked up a large container of coconut oil after reading of the health benefits of cooking with it.  One fact that really got me was that since it is solid at room temperature it is less susceptible to becoming rancid, lasting often up to two years.  Also it is not a highly processed or refined oil such as our supermarket canola or vegetable oils and won't break down and oxidize when heat is applied aka. cooking.  Nor is it GM which cannot be said for many of the "cooking" oils out there.  Here is a great description of when and how to use fats from one of my favorite bloggers over at Empowered Sustenance.Hers was the first blog I ever read when I first started my real food journey.  She has a great little print out for quick reference.  While you are there you should definitely browse her blog, she is chock full of information!

coco-oil2Currently I purchase Carrington Farms brand Coconut oil in my local club store but there are many varieties available in smaller quantities so you don't have to commit right away (remember this stuff practically never goes bad).  Tropical Traditions is a well loved company, and Spectrum and Nutiva brands are available in most health or whole food markets.  I quickly found the amount I am using on a daily basis it is best for me to go with larger containers.

Coconut Oil Recipes

Coco-Coffee Sugar (or salt) Scrub

This moisturizing and exfoliating scrub can be used daily however, if you have sensitive skin, use it 1-2 times a week to keep your skin smooth and soft. If you choose to use salt rather than sugar make sure you use the scrub before shaving as the salt can irritate freshly shaved skin. This is a great use for those coffee grounds that would normally be trash.
  • 1 Cup Coffee Grounds
  • 1 Cup Organic Coarse Sugar or Coarse Sea Salt
  • 1 Cup Coconut Oil
Slowly melt the coconut oil in a small saucepan over low flame. Pour into a pint size mason jar or other airtight container and mix in the coffee grounds and sugar or salt.

Skin Smoothing Deodorant

This deodorant passed the workout test! Mind you, I did sweat, and you are supposed to, but I did not stink. Commercial products contain many harmful chemicals that are absorbed through your sweat glands and into your system. This will keep you smelling fresh and your body will begin to heal from the chemicals in commercial products and you will begin to sweat less! This is a small recipe that can be doubled when you decide to switch over completely.
  • ¼ Cup Coconut Oil
  • ¼ Cup Arrowroot Powder -cornstarch may be used
  • 1 ½ tsp Baking Soda
  • 5 drops Tea Tree, Rose Absolute, Lavender, or Essential Oil of your choice
Cream the first 3 ingredients together in a bowl. Add the essential oil and mix until combined. Store in ½ pint mason jar or other airtight container. Apply a small amount with your fingers or a make-up sponge as you would commercial deodorant.

Coconut Oil Face Cleansing

You won't believe me until you try it but your skin will be clearer and cleaner by using this method. As with most new and healing regimes, sometimes your skin gets a little worse before it gets better. There will be a short grace period before you see the major results but, please, stick with it. I promise you will be so happy you did!

  • 3 Tbsp Coconut Oil
  • 3 Tbsp Jojoba Oil
Slowly melt the coconut oil in a small sauce pan over low heat. Add the jojoba oil and pour into a small glass airtight container.

I learned about this method of cleansing from Thank Your Body and decided to try it with coconut oil.  I have been very happy with the results.

To Use:

Pour a ½ tsp amount into your hands, rubbing together to warm, if the coconut oil has resolidified make sure you get a bit of both oils in your hands, they will recombine. Begin rubbing into your face using slow, massaging circles. Take your time with this, relax and enjoy the facial massage. Turn on the hot water and heat until it's the warmest you can take but not enough to burn. Wet a soft cloth and hold to your face for 10-15 seconds then wipe your face gently to remove the oil. Repeat a few times until the oil is removed. Apply a very small amount of oil under your eyes and if needed to dry points on your face.

Grain-free Banana Pancakes

  • 1 Banana, mashed
  • 2 Eggs
  • Sprinkle of warming spices such as cinnamon or nutmeg (optional)
  • 1 tsp Coconut oil
  • ¼ Cup Homemade or Greek Yogurt
  • Handful Berries
Whisk together Banana and Eggs in a bowl. Heat Coconut Oil over medium heat, preferably in non-stick skillet. Pour in Banana mixture and cook for 2-3 minutes. Flip and reduce heat to medium-low. Cook for 5-7 more minutes. Remove to a plate, top with the yogurt and berries. Enjoy!

Coconut Oil Mayo

This may be for a real die hard coconut oil fan. I made it the other day replacing the oil called for with coconut oil. The hubinator did not notice, simply thought it was a bit tart I however, enjoyed it immensely but would not use it to replace mayo in a ham sandwich for instance. It would be great for a tropical coleslaw, as a dip for battered fish (fried in coconut oil of course) or for a curried chicken salad. You can substitute half the coconut oil for olive oil if desired. This mayo can be fermented as well for a longer lasting fridge life, simply add 1 Tbsp of Whey and leave out for 7-10 hrs for the bacteria to do their job.

  • 2 large egg yolks
  • 1 tablespoon fresh lemon juice
  • ¼ tsp Dijon mustard
  • ¼ tsp table salt
  • Ground Pepper, to taste
  • 3/4 Cup Coconut Oil
Gently melt Coconut oil in small sauce pan, set aside to cool slightly. In food processor, combine yolks, lemon juice, mustard, salt, and pepper until combined, about 10 seconds. With machine running, gradually add oil in slow steady stream, about 30 seconds. Scrape down sides of bowl with rubber spatula and process 5 seconds longer. Adjust seasoning with additional salt and pepper if needed.

Quick and Easy Everyday uses for Coconut Oil

Apply a small amount to cuticles and callouses before bed.

Dab a bit under and around your eyes to soften skin and reduce wrinkles.

Add a teaspoon to your morning coffee to help moisturize from within.

For Curly Hair: Apply a small amount to your hair and comb through after conditioning to help tame frizz.

For Straight Hair: Apply a small amount to your ends after towel drying and let hair air dry or heat style as usual.

Use a thin layer of coconut oil instead of shaving cream.

Apply a small amount to your body before you towel off, while you are still wet from the shower and your pores are good and open from the heat.  Towel off and go about your usual routine.  Great for winter when your skin is extra dry.

*Many of the recipes used here are adaptations of recipes I have found on the internet.  I have played around with them until I found what worked best or tasted best to me.  I urge you to experiment with the quantities, making small batches at first to find what suits your skin best.  As with most new things, test it out before slathering your body with it!  If you are concerned about any essential oils mentioned, please use the best quality available and definitely test on your skin!

My Indian Kitchen: More Recipes

***I am greatly saddened by the events of yesterday in the beautiful city of Boston. Actions like this make me question my belief in the inherent goodness of humanity. I truly believe that people, at heart, are good and kind. However, when an event like this occurs, I feel lost and scared. I am scared for the families of those injured or dead, I am scared for the children present who will now grow up with this as a prevalent memory of their past, and I am scared for the repercussions towards people who were not involved but may simply be of the same race or creed of the people or person behind this horrible action. The sad fact of humanity is that we often are afraid of what we don't understand and lash out in poor ways in the guise of strength.

During this time of mourning and loss, please remember that the human next to you is simply trying to live their life as best they can, the same as you are. Their beliefs or skin color do not mean they are going to bomb you, fly a plane into a building, or open fire in a public place.

We should not take away with us hate, but compassion and love, as we are a nation built on the differences and beauty of the cultures that comprise our country.

This is what the Boston Marathon and Boston's Patriot Day truly stand for.


“You must not lose faith in Humanity. Humanity is like an ocean: if a few drops of the ocean are dirty, the ocean does not become dirty”

-Mahatma Ghandi***


SAMSUNG

This past Sunday was the celebration of the Tamil New Year. Tamil Nadu is located in the south of India and is where my husband's family, on his father's side, is from. The New Year, like our December celebration, is a time for prosperity and growth. This is the time of year it is believed, that the creator of the world, Lord Brahma, began creation. This is a time of rebirth and rejuvenation. Just like our New Year, it is time to make resolutions and changes towards a better life. Happy Vishu!!!

My Indian Kitchen returns this week with a few new recipes. This first recipe, Upma, is one of my husband's favorites. I make it often for breakfast or lunch and it can be served with Sambar and Vegetable for a filling dinner. I also have a recipe for another Indian soup called Rasam. This soup is a favorite around here. Lighter than Sambar but with a similar tang from the tamarind, and heavily laced with cilantro, it is delicious served over rice with some yogurt.

Upma is similar in consistency to thick Cream of Wheat or Polenta.  Cream of Wheat can be substituted if Sooji cannot be found.  Simply roast it in a dry skillet for a few minutes, being careful not to burn it.  Water can be used for the Yogurt portion and Oil for the Ghee to make this dish vegan.

upma
 Upma
  • 1 Cup Roasted Sooji -similar to Cream of Wheat, available in most Indian markets
  • 2 Tbsp. Ghee
  • 1 ½ Cups filtered Water mixed with
  • ½ Cup Yogurt -homemade is best, not greek
  • 1 tsp Urad Dal
  • 2 small Green Chilis -stem removed and broken in half
  • 1 tsp grated Ginger
  • ½ tsp Cumin Seed
  • ½ tsp Black Mustard Seed
  • 4-5 Kari Leaves
  • Raw Cashew Nuts, small handful, chopped in large pieces
  • Salt to taste
Heat Ghee in a sauce pot over medium flame. When hot add your Mustard Seed and cover with splatter screen. When they are popped add in your Urad Dal, Cumin Seed, Kari Leaves, and Cashews. Fry briefly then add the Green Chilis, and Ginger. Turn heat down to low and pour in your Water/Yogurt Mixture. Add a bit of Salt to taste. Then slowly whisk in your Roasted Sooji, stirring constantly until thickened. Off heat and cover. Let sit 5 minutes then serve. It should be the texture of a dry Cream of Wheat, slightly sticky but a bit crumbly.

Serve with Coconut Chutney or Pachadi

Coconut Chutney

  • ½ grated Coconut
  • 1/3 Cup Roasted Chana Dal -available in most Indian markets
  • ½ Cup filtered Water
  • 2-3 Green Chilis -stem removed and broken in half
  • ½ tsp Salt
  • 2 Tbsp. Yogurt -homemade is best, not greek
  • 2 tsp Black Mustard Seed
  • 1 tsp Urad Dal
  • 2 tsp Ghee
Blend the Coconut, Roasted Chana, and Water until a smooth consistency is reached. Add your Green Chilis, Salt, and Yogurt. Heat Ghee and add Mustard Seed and Urad dal. Fry until Seeds pop, add to the Coconut mixture. Taste for salt and serve as a condiment for Upma, Idlis, or Dosa.  Replace the yogurt with lemon juice and the Ghee with Oil to make this vegan.

Pachadi
  • 1 large Tomato, cut into wedges
  • 1 Cup Yogurt
  • 1 tsp Black Mustard Seed
  • Salt to taste
  • 2 tsp Ghee
Heat Ghee in small saucepan. Add Mustard Seed and pop. Add in your Tomato and fry a few minutes until cooked down a bit. Combine Yogurt and Salt in a bowl and mix in the fried Tomatoes.

Rasam

  • ½ Cup Toor Dal
  • Small Lime sized ball of Tamarind Paste
  • 2 medium Tomatoes, chopped -reserve a few pieces, chopped smaller
  • 2 Tbsp Rasam Powder (recipe follows)
  • 1 Tbsp Salt
  • ¼ tsp Asafoetida
  • 3 Green Chilis -broken in half and stems removed
  • Small bunch Cilantro
  • 20 Kari Leaves
  • 1 tsp Mustard Seed
  • 1 tsp Cumin Seed
  • Ghee or Oil
Soak Toor Dal in water for ½ hour. Drain and add to a pot with 2 cups fresh water. Bring to a boil then lower heat. Cook partially covered until cooked through, approx 1 hour. Mash and add 1 ½ cups more water. Set aside. Meanwhile, soak Tamarind in 2 ½ cups hot water. Strain, squeezing as much liquid out of the pulp as possible. Set aside.

In a large pot combine Rasam Powder, Salt, and Asafoetida. Add tamarind water, green chilis, and tomatoes. Bring to a boil then reduce to a simmer for 10 minutes, stirring often.
Add cleaned Cilantro, Kari leaves, Toor Dal, and reserved Tomatoes. Cook for 10 minutes more. In a separate skillet, heat 3 tsp Ghee or Oil. When hot add Mustard Seed and pop, add Cumin Seed and fry for a few seconds. Add this to the Liquid, off heat and let sit 10 minutes before serving.

rasam_powder 
Rasam Powder

Fry separately without oil and with low heat:
  • ½ Cup Coriander Seed
  • ½ Cup Cumin Seed
  • 1 Tbsp Black Peppercorn
  • 2 red Chili Peppers
  • 1 tbs. Chana Dal
Add ½ tsp Asafoetida and blend to a coarse grind. Store in airtight container for up to 6 months.

Soak Your Nuts!

Soak_ur_nuts

Now that I have your attention, I want to talk a little bit about how to properly prepare grains, legumes, seeds, and nuts for optimal digestion. Properly prepare? What the heck does that mean? Properly or, traditionally prepared foods are foods that have been treated in a way to maximize their nutritional availability and digestibility. Grains, legumes, nuts, and seeds contain a toxic compound that not only makes them hard for us to digest but also binds to minerals rendering them useless and unavailable to our bodies. This compound is phytic acid, an anti-nutrient and general malcontent, a selfish little compound that does not want to share the healthy magnesium, calcium, iron, or zinc that is present in the foods we consume. Not only are these minerals from the grains, legumes, nuts, or seeds not bio-available but also from the other foods we are consuming along side. The other problem with these foods are the short-chain carbohydrates, also known as sugar, that are hard for our bodies to digest and tend to stick around in our guts and ferment. As opposed to good fermenting, in jars, outside our bodies, growing good bacteria, this fermenting in your intestines causes gas, bloating, and inflammation.

I am sure at this point you probably are thinking “Why in the world would I continue to eat these foods if they do all that to my body?” Well, there are many camps that agree and won't touch the stuff. Paleo and Primal ways of eating do not include grains and legumes and do not see the point of eating food that is so disruptive to the digestive system. Here is a good description of Paleo by Diane Sanfilippo over at www.balancedbites.com. I follow a different theory of healthy ways to eat. As opposed to Paleo, my diet includes Properly Prepared grains, legumes, nuts, and seeds. This follows the Weston A. Price Foundation, or WAPF way of eating. You can learn more about that here, www.westonaprice.org.

Properly preparing foods cuts down on the level of phytic acid present and performs a sort of “pre-digestion” if you will, making these foods much easier on your digestive system and allowing the minerals to be more bio-available. There are 3 methods of proper preparation: Soaking, Sprouting, and Fermenting.

Soaking and Fermenting: Essentially Soaking leads to Fermenting however a short 24-48 hr soak does not necessarily mean your food is fermented, the process has only just begun. Typically a good soak is all you need for proper digestion of legumes and grains. You want to combine filtered, un-chlorinated water in a ration of 2:1 of your legumes or grain. Some believe that heating the water is necessary but I think that making sure you allow for a good long soak is all that is needed.

whitebeans_w_kombu
Give your legumes (or grains) a good rinse then place in a large bowl and cover with filtered water. Allow to soak for 24-48 hours. After soaking, rinse again, discarding the soaking liquid, and cook as you normally would. It is also believed that the addition of an acid such as lemon juice or raw apple cider vinegar with further break down the phytic acid, as well as the addition of a piece of Kombu, an edible kelp. You will want to add a tablespoon of the acid or two 2 inch pieces of kombu. You can change the water a few times over the two days if you are soaking but do not if you are fermenting.

Fermenting will lead to the growth of beneficial bacteria and fall into the realm of sourdough, Indian snacks such as dosa and idli, and soured porridge. This is a whole other post all together as there is a lot to cover on the topic of fermented grains and legumes.

Sprouting: Sprouting is the initiation of the lifecycle of the seed. Grains, legumes, seeds, and nuts are all seed of a plant therefore, once soaked they begin the process of growing into a plant. This process diminishes the phytic acid and anti-nutrients making them much more healthful. Sprouting is very simple to do:

Place 1 cup of grain, legume, nut, or seed into a quart size mason jar. Cover with 2 cups filtered water. Allow to soak over night in a warm spot. The next day, pour out the water and rinse well. Cover the opening of the jar with a bit of cheese cloth and let sit overnight again. Rinse and repeat a few times a day until you see little sprouts shooting out. Your sprouts are ready once they are approximately the length of the seed.

sprouted_grains
From here you can dry them for cooking later or grinding into flour. You can also eat them raw in salads or on sandwiches. The sprouts can be dried in the oven at 150° for anywhere from 10-24 hrs. Allow too cool and store up to 6 months. I always have mason jars full of sprouted and dried grains and legumes in my pantry so that I don't have to prepare 4 days in advance if I want sprouted quinoa for dinner on Wednesday.

A few recipes for your hard work. Sit back and reap the benefits of Properly Prepared Foods!!!

 Essene Bread from the Sprout People

 Sprouted Lentil Recipes from Gnowfglins.com

Creamy Grits, Two Ways

Soak your grits for a few days before cooking to yield a creamier consistency. Cook them as you would normally and enjoy with a pinch of salt and butter. Then with the leftovers, stir in a chopped garlic clove and some cheddar and pour into a casserole or bread pan. Chill in the refrigerator then slice and fry in butter for a tasty second round.

Crispy Nuts

Combine 4 cups nuts with 1 tablespoon of sea salt and cover with filtered water. Allow to sit in a warm spot over night. Drain and spread on a baking sheet and dry in the oven at 150° for 12-24 hours. Store in an airtight container for up to 3-4 months.

Easy Fermented Veggies

Image

Fermented vegetables taste so darn good and are just as good for you.  I spent my morning whipping up a few batches and thought I'd share a quick post on how I did it.  They just looked too pretty all lined up, not to share would be a crime!

A few words on how fermented foods are good for you.  We all know we should eat yogurt cause of the good bacteria and "regulative" properties of it.  I mean a certain, will remain un-named, brand has built a whole campaign on how great you will feel after over indulging, if only you eat their yogurt.  Fermented vegetables work in a lot of the same ways

  • Aid in digestion

  • Re-balance the good bacteria in your gut; Many people who suffer from issues like Irritable Bowl Syndrome or Candida, or even Allergies, have an imbalance of beneficial bacteria.  Including home-made probiotic foods in their diet often alleviates the symptoms.

  • Fermentation increases the nutrients, amino acids, vitamins, and minerals, of the food.  It also allows your body to more readily access these nutrients.
I could go on and on about the science behind it or the benefits of it but I did say this would be a quick post.  There is so much information out there, it is definitely worth a web search to read more extensively.

You only need a few items to get started: Wide mouth quart size Mason Jars, Sea or Kosher Salt, Vegetables, and a Culture Starter Get it Here

Shred, chop, cube, or slice your vegetable, enough to fill the Mason jar almost to the top.  Example: 2 Large Beets, sliced to 1/4 in, 1/2 small head of Cabbage, shredded as if for coleslaw, 4-5 Large Carrots, cut into matchsticks.  Experiment to see what ends up working for you with the size and shapes of the veggies you choose.

Boil 1 Quart Filtered Water.  When boiling add 2 tablespoons Sea or Kosher Salt and stir to dissolve.  Let sit until it reaches room temperature.  I often do this the night before and will usually make a few quart at a time since I like to do batches of veggies every few weeks (sometimes days when I get a good haul from the garden or farmer's market).  Remember 2 Tbsp Salt per Quart of Water.

Once your water is cooled and your veggies are chopped, begin packing them into the jars.  Pack them pretty tightly. Here is where you can get funky with flavorings. I like to add a few chunks of ginger and a grating of orange zest to my beets. I use cumin seed or ginger with my carrots and pickling spice with cucumbers. Pictured below, I added 2 Tbsp of Sambar Powder (see previous post) to chopped Cauliflower. Play around with spices and fresh herbs to change up the flavors.
Once you reach about 1 -1 1/2 inch from the top, sprinkle in about 1/8 tsp. of your starter culture.

Pour your salt water over the veggies, pressing down with your hand occasionally to really get them jammed in there.  Fill to the shoulder of the jar making sure none of the veggies rise above the water level.  I found that pressing a clean glass tea light holder onto the top of the veggies holds them nicely under water.

Cap and leave for 3-5 days, even up to a week.  You should start to see bubbles running through the ferment.  When it stops bubbling it is likely done.  Uncap and taste, if they taste too salty then let them go for a few more days.

Image

Heartier veggies like cauliflower or brussel sprouts may need up to a few weeks to fully develop their flavor.  I left my Saurkraut out for 3 weeks then 2 more in the fridge before uncapping and eating.

Just one note:  unless you purchase special fermenting lids like Pickle-Pro Lids you will want to uncap every few days to relieve the pressure.

Fermented foods keep months in the fridge, that is if you don't eat them within days.

Happy Fermenting!

The Early Arrival of Spring

SAMSUNG

Spring starts in December in my house.  When the seed catalogs arrive I get the same excited feeling that kids have on Christmas Eve.  I immediately begin planning, I pull out my charts and lists from previous years, my highlighter to daydream in the catalogs, graph paper, pencils, and my seed box.  I LOVE when the catalogs arrive, they are a beacon in the dreary cold that springtime is around the corner.

This year we needed to order a lot of seeds as many of ours are now a few years old.  The older the seed the lower the germination rate, so it's best to replenish your stock every few years.  We order our seeds from Gourmet Seed International.They are a small, family owned company that offers high quality, non GMO seeds, supplies, and has always been knowledgeable in answering our questions.  And now the fun starts!  I clean off my dining room table, make a cup of tea, and spread out my charts.  I begin by referencing my notes from the years before.  I know this year I need to order tomato seeds so I check my notes from last year, we weren't happy with the plum variety we planted and missed not having cherry tomatoes.  From here I go to the catalog and research the best tomatoes for my growing conditions.  This continues with each type of seed we want to plant until I have a completed seed list and can place my order.

Seed List

The next step is to come up with my planting schedule.  The majority of this is based on the last spring frost.  I like to use online almanacs and planting guides, I can also refer back to when we planted the year before and how it went.  For instance, two years ago we planted too late so were not able to fully utilize the growing months, and last year we over compensated and planted too early so when it came time to transplant , they were leggy and overgrown.  I think we are pretty well on schedule this year if the weather doesn't get too crazy.

Planting Schedule

seedlings seedlings2

My okra was the first to raise it's head, then the tomatoes and cukes.  I get so excited and run to check on them every morning!

The time between planting my seeds and transplanting outdoors is an antsy one.  To keep my self from going nuts, I use this time to plan the layout of the garden.  As I mentioned, we use the Square Foot gardening method.  The theory behind this is that you can grow more in a smaller amount of space.  In one square foot of space you can grow 16 carrots or 9 beets, where as in traditional gardening (in rows) you would need a 5 ft row.  Now imagine if you took my seed list and needed a 5 ft row for each type of vegetable, my whole backyard would be taken up!  This method also allows you to place plants strategically reducing pests and disease, and maximizing plant health by utilizing companion planting.

I plan my layout starting with the plants that take up the most space, cucumbers, tomatoes, and husk cherries.  They get rotated yearly so they are never in the same place 2 years in a row.  This practice helps avoid blight and nutrient deficiency.  We had a hard time with cucumber beetles last year and I found, through research, that nasturtium repel them therefore, I placed nasturtium near all the plants that cucumber beetles are attracted to (it's also very tasty in salads).  You can stretch the growing season of your lettuce if you plant it near taller plants that offer shade through the hotter months.  Peas and carrots don't just go well together on the plate, the carrots boost pod production in the peas.  Potatoes will inhibit the growth of your tomatoes, don't plant them near eachother!  Companion planting is an integral part of organic gardening, plan your garden wisely.  This part of the process takes a long time, it's like trying to put together a jigsaw puzzle without knowing what the picture is.
Garden Layout 2013 Garden Layout 2013

So that's it, that's how spring arrives in December for me.  Now that it's April I can get out in the yard and clean up our boxes and get everything ready for the gardening season.   I can't wait to share with you our garden as it grows through the summer!

My Indian Kitchen

Market

My adventure with Indian cooking began many years ago when my husband and I had our first apartment together.  His father is Indian and his mother is Irish.  He didn't eat a lot of Indian food growing up but remembers his father cooking it all the time. My Mother-in_Law was instrumental in compiling these recipes. She sat next to my Aunties and hand by hand measured the spices put in to each recipe. I owe her everything that is in the recipes I share with you. My husband has travelled to India numerous times and now I can also say I have a number of trips under my belt as well.

I have always been intrigued by the flavors on Indian food.  I remember as a child, one of my best friend's family was from India.  It was always a real treat to go over to her house and see all the beautiful things they had collected through the years.  But my favorite was when they served Indian food.  She was always embarrassed, but I ate it up, quite literally!

As I began to learn to cook as a young adult, my husband introduced me to Sambar and Rice.  I never knew Indian food could be so light but rich, spicy, and......healthy?  Gone were the cream sauces and heavy meat dishes of my youthful forays into Indian food.  This was full of vegetables and healing spices such as fenugreek, cumin, and turmeric.  I was mystified the first time I stuck my nose in a baggie of homemade sambar masala, flown straight across continents in my husbands suitcase carefully snuggled deep in the yards of my first sari.  I was transfixed the first time I successfully popped black mustard seeds in hot ghee, the crackling bright aroma filling my kitchen.  This was the Indian food I was meant to eat.

Please don't get me wrong, North Indian food is fabulous but I have had a love affair with South Indian for so many years now that it seems traitorous to eat anything but.  I want to give you a few simple tools for stocking an Indian pantry and making a couple basic recipes.  I have learned a lot from my family recipes but my favorite cook book of all time is Dakshin: Vegetarian Cuisine from South India. This book hosts many delicious and authentic recipes that are quite easy to make once you have a few items on hand.  I am going to start out by giving you a list of spices you should keep on hand.

The Spice Box

Image

This is a traditional spice box that you can find in almost any Indian kitchen.  I bought mine in India but they are available online or in a well stocked Indian market.  It's absolutely not necessary to have one but it sure makes cooking a lot more fun!  This box holds the staple spices you will need for most South Indian dishes.

Starting from the bottom right and moving left (5:00)

  • Cumin Seed
  • Small Mustard Seed; look for the ones labeled "Andhra Mustard Seed", large will work too
  • Black Peppercorns
  • Fenugreek
  • Channa Dal; Bengal Gram or Yellow Split Peas
  • Urad Dal; Black Gram
  • Dried Red Chillis
Not pictured:

  • Asafoetida or Hing
  • Coriander Seeds
  • Turmeric Powder
  • Toor Dal; Red Gram or Pidgeon Peas
  • Tamarind Pulp
  • Kari or Curry Leaves
Cooking Fats

  • Ghee or Clarified Butter
  • Gingelly Oil, Indian Sesame Oil
  • Any light oil with a high smoke point
These are the basic items you will need to start cooking your South Indian Dishes.  Let's start off by making a Masala, or spice powder.  Masalas can also be a paste and are comprised of any number of combinations of ingredients.  We are going to make Sambar Masala which you will use quite often and is featured in many of the recipes I will share with you here.  I suggest making a big batch, it can be a bit time consuming and possibly tedious but it keeps for months in an air-tight container and is well worth the effort.

Sambar Masala

Image

  • 3 Cups Coriander Seed

  • ¼ Cup Channa Dal

  • 1 Tbsp. Black Peppercorns

  • ½ Tbsp. Fenugreek

  • ½ Tbsp. Black Mustard Seed

  • 1 Tbsp. Turmeric

  • ¾ Cup Chilli Powder (dried red chillis ground to a powder)

Dry fry each spice separately over medium heat until they turn a light brown. Do not fry the Turmeric or Chilli Powder. Allow Spices to cool then grind to a powder in a spice grinder. Mix in the Turmeric and Chilli Powder. Store in an airtight container, will keep for months.

Now that your pantry is stocked with all sorts of wonderful spices and you've made your beautiful Sambar Masala, let's get to the stuff you're here for!

South Indian Meal: Recipes